Saturday, June 27, 2015

From Require.js to Webpack - Part 1 (the reasons)

Wherein I layout all of the reasons why we decided to move off of require.js and on to webpack.

About 2 months ago we completed a migration from require.js to webpack. Require.js had been the primary UI module system at PayPal and was baked into the default template kraken server we use to build our applications. Everyone was familiar with it and it worked pretty well. Despite our success with it, I identified a few features that were provided by webpack that ultimately led my team to migrate off of require.js. This is an overview of the reasons why we chose webpack.

I hope this proves helpful to you as you seek to improve your own module/build systems!


CommonJS By Default


Working in node all of the time, we sure like our common js modules. Despite a handful of CJS-like structures supported by require.js (including the "lite" CJS wrapper and partial support for the syntax within r.js), it really does not work as expected. There are a number of key differences.

1. Confusion about returning vs. module.exporting
2. Module resolution path (it will default to ".", which is basically like adding path.resolve() to everything.)
3. NPM support (including the package.json "main" field, etc.)


Client-side Unit Testing


One of the immediate benefits we experienced was being able to rip out this excessively annoying code we had to put in place to support client-side unit testing. There was a great deal of things we had to do to get mocha to support the files in the require.js. All of this code we were literally able to rip out and throw away once a file was moved to CJS, because node could just read the module and as long as it didn't rely on the DOM it could be tested like any other node module. Up until this point our client-side coverage had been terrible. With this change it was much easier to ratchet up the testing much further.


Re-use and modularity


Moving to CJS also opened up a flood of module reusability. This reusability was always available with AMD modules. Why the change? The reasons were 2 fold:

1. Syntax parity with our node.js code meant we started applying the same practices we were already applying to our node code to our client-side code. It turns out that we associated certain patterns with AMD code (monolothic) and certain types of patterns with our CJS code (modular). This meant that even though the shift was primarily mental, we quickly adopted a more modular approach to our UI code-bases when took that mental shift.

2. Actual compatibility with our server-side code meant that a number of important modules (date/time formatting, various utilities, etc.) could be directly shared and reused immediately.

Re-sharpening of our focus on modularity and sharing was one of the main benefits of the move to webpack.


NPM Support


While the CJS syntax itself is quite a bit nicer than the AMD syntax and provides a bunch of benefits as listed above. The most important reason for switching to webpack is full NPM support. Meaning I can install any module with NPM and without any extra work require() that into my library. Technically, this was possible with require.js, but it was really difficult and limited in scope:

NPM with require.js:

1. Expose your node_modules folder as a publicly accessible route in your app.

2. Add an alias from your module to the convoluted new module path in your config.js.
3. Make sure the module you want has 0 dependencies (because they won't work at all.)
3. define('your-module',  function(yourModule) { });

NPM with webpack:

1. require() the module.


Mature ES6/Plugin Support


Webpack Loaders are awesome. Require.js plugins on the other hand are not well supported and syntax can be confusing define(['css!styles/main'], function() { /* .. */}). The loader config in webpack is a breeze and the plugin ecosystem is much stronger.

With requirejs I tried to add ES6 support using the legacy es6 require.js plugin which is based on Traceur. I just couldn't get it to work, so we moved to 6to5 (babelusing a two-step process. First, we'd run babel to convert our files to JS and then we'd suck them up with require.js. Later we'd need to run some kind of "clean" command to remove the extra files it left hanging around our file system. 

Using babel-loader had proved to be a lot simpler and nicer and has cut both one step and additional time out of our build process. Source maps of course work out of the box as well.

With all of the great plugins including built-in support for uglify and other thing we barely need grunt at all for building our app. Almost all of it is done by webpack directly.


Concerns

When I showed the team the changes and talked with various people about them I'm frequently bombarded with the same two questions. People are generally under the assumption that it's no longer possible to do an asynchronous require() and others wonder why we didn't just go with browserify. There are good stories for both, so hear me out.


What about asynchronous/dynamic requires?


Asynchronous require's are often helpful in large projects. In our case we used the AMD require([]) at the router level to do something like this:

routeChange(path) {
    require(['/views/' + path], function(PageView) {
        app.setView(new PageView());
   }
}

This allowed us to avoid defer loading hundreds of kb of code until it was absolutely necessary and avoid loading code for different parts of the app that weren't being accessed at this time. It's a pretty neat trick and one we didn't really want to give up.

Turns out, we didn't have to give it up. Webpack supports this with only minor changes to the code above. In the end our various bundles were the same size or smaller than the ones created with r.js (not to mention the build time was cut down from 50s to around 10s).

I'll go more into the exact code we used to get this to work in the follow up, but if you're interested you can check out Pete Hunt's popular Webpack How-To for those getting started which has a nice section on async loading.

Why not browserify?

Browserify is pretty legit and indeed my first 2 attempts to migrate to away from require.js were both to browserify. Browserify has been innovating in this space for ages and was the obvious choice when I started this project. Where did it fall down?

1. Spotty support for AMD modules (even with the deAMDify plugin)
2. No built-in way to asynchronously require().

AMD Support

Because migrating all of our UI code from CommonJS to AMD meant changing nearly 1000 files, clearly we wanted to automate that in some way. A number of tools support this in one capacity or another, but none of them worked very well. As with most folks migrating away from AMD land, the easiest way with browserify was to use the deAMDify transform. This almost worked! Despite it being sold as the solution to our problems it fell down pretty hard in two areas:

1. The path resolution was still common.js based. It didn't know about our public/js folder. It didn't look for "module" in a relative path by default like AMD does, it looked for it in NPM. It ran into a lot of problems. Eventually I had to fork the transform in order to add support for this functionality, which was a pretty big pain in the neck.

2. It didn't support dependencies that weren't assigned to variables.

define('dependency', function() { }); was not translated to require('dependency') as expected. It just broke the system.

While this wasn't too hard to fix, the module itself had been abandoned by the maintainer and despite multiple tries to help, at that time we weren't able to get any of this stuff fixed. (Thankfully Tim Branyen has taken over the the deamdify module now and is very responsive to changes!) 


While the AMD support was frustrating, ultimately we were able to fix it, but we ran into an even bigger hurdle, which ultimately ended our test with browserify.


Async require()


I already covered how webpack supports AMD-style require() statements above. It turns out that there's nothing like that built in to browserify. The suggestion is to just basically load everything up front. This is all well and good for most apps. For an app the size of PayPal.com it turns out it's not such a good idea and leads to megabytes of extra code being loaded.

Another alternative to async require() with browserify is to manually bundle things. This will actually work. You need to add two <script> tags to your page. One for the main bundle and another for the specific "sub-app" that you're working with. This is pretty great if you start your app this way, but going from async require() to a lt;script&gt tag approach for each sub-app was extremely hard. I didn't have time to completely re-factor our routing system and test everything, so eventually I gave up.

Webpack allowed me to get the benefits of browserify without having to re-factor major parts of our codebase.

Conclusion


Webpack has been a huge help to our client-side code base and developer experience in general. It's allowed greater parity and reuse between our client-side and node code, it's made testing our code much easier and it's allowed us to cut way down on the config and extra support code needed to maintain two different module systems in the same code base. The most important thing it has provided though is access to the NPM ecosystem in the browser. Coding will never be the same again :)

Look for a follow-up post detailing the technical aspects of the migration in the next couple of weeks.

* In case you wanted to know most of the UI code at the time of the migration was written in Backbone. Unmentioned in the article was that we're starting to move a lot of stuff to React and NPM support was crucial for us to do that well.
Friday, March 14, 2014

Custom Error Objects in JavaScript

For an upcoming talk at Mountain West JavaScript I'm going to talk about some basics in error handling. One of the advanced techniques that's a bit more advanced is the idea of creating custom errors objects to pass through your callbacks.

Why Error objects?

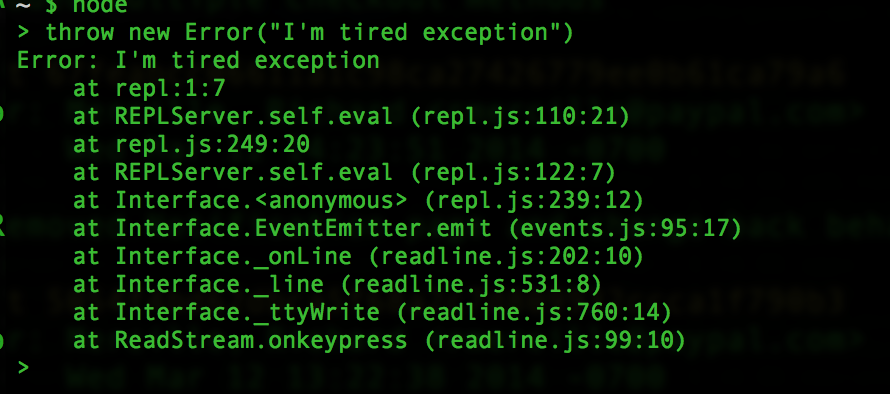
When following the callback pattern it's really nice to be able to depend that your error will return data in a consistent format. Error objects give you 2 things that are super important: message and a stack trace. Here's an example:


The stacktrace is extremely important and is likely the reason why using standard error objects is so popular in node.

Why Custom Error Objects?

Despite the awesomeness of general error objects, sometimes you need more information. You may need an array of error messages or some kind of error code in addition to the error message. This is where custom error objects come into play.

Creating a Custom Error Object

This is the most succinct constructor I've found to create a custom Error in Node. Importantly it satisfies several criteria:
  • There is a message property which includes the error message
  • There is a stack track (as a string in the stack property)
  • The error type is included in the stack trace (which is based on the name property)
  • You legitimately inherit from Error (i.e. instanceof Error is true)
function MountainError(message) {
   Error.captureStackTrace(this);
   this.message = message;
   this.name = "MountainError";
}
MountainError.prototype = Object.create(Error.prototype);
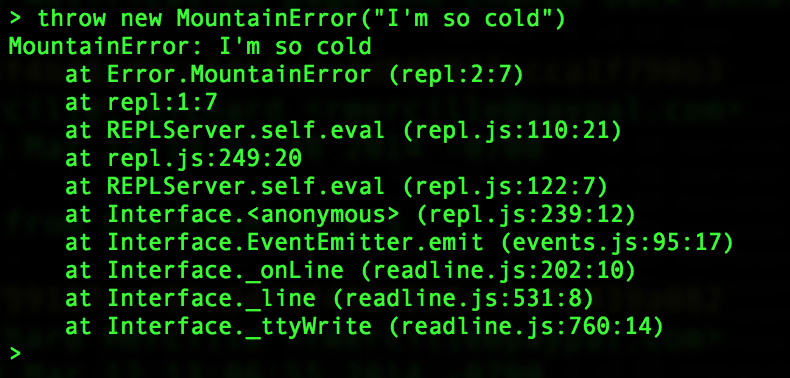
So go ahead and create this new object and see what you get!


Your new error object includes all of the standard stuff that you'd see in an error (including the stack trace, but you can start fiddling with it, adding extra properties, etc).

Happy erroring!

Resources


Thursday, August 15, 2013

Stop Complaining about the Angular.js Docs

This article assumes you've used github but that you're not a pro at contributing to large projects.
After rolling out some internal angular.js apps for my team I found a lot of people can be confused by the angular docs. Its documentation covers many things, but the examples and explanations don't always make sense to those new to angular. Just the same as with any open-source project, the poor documentation is just as much my responsibility as it is the responsibility of anyone on the Angular team.
How much documentation had I written? How many pull requests had I sent? The answer, obviously was none, so I went to github, forked the project and decided to make the ng:class docs suck a little bit less.
I was pretty sure at this point that it would take me about 5 minutes to come up with a better example, but it ended up taking me many nights to get it just right and finally get some small changes merged back into the main project.
I don't want you thinking it's too hard or a waste of time. It is totally worth it! I'll share what mistakes I made and what I found complicated, so you can help improve the docs right away!

Getting Setup

Before starting you'll need to have reasonably new versions of the following software installed on your machine:
Then you'll need to fork the project and check it locally. You may also want to create a branch where you can do your work.
git clone https://github.com/YOURNAME/angular.js.git`
cd angular.js
git checkout -b docs_update
Now typing the grunt package command will prepare your files for being viewing and testing locally.
grunt package
With that in place you should now be able to browse the current docs by going tohttp://localhost:8000/build/docs/.

Where is the documentation?

All of the documentation, including examples, is found within the angular.js source code. For example, the ng:class source code is located inside of the src/ng/directive/ngClass.js file. The code examples use custom markup (angular directives) that look something like this:

<example>
  <file name="index.html">…</file>
  <file name="style.css">…</file>
  <file name="scenario.js">…</file>
</example>

  
These correspond with the tabs generated in the example portion of the documentation.

Making Changes

When you are ready to start editing the documentation examples you can just press the "Edit" button included on each page. This button will take you to a working version of that example on a 3rd party site that you can modify to your liking.
Once you've modified the code enough paste it back into the comments of your source code, comment it out and make sure it works.
After you make a change you should
grunt docs:process
Once that's done you can check your work locally by running a webserver and viewing the documentation.
grunt webserver
This will start a local webserver on port 8080 and allow you to visit the docs at a URL similar to this one:http://localhost:8000/build/docs/api/ng.directive:ngClass
Some of the CSS used in the angular docs may be different from what is used on the site where you edited your example, so make sure you check out your example on the actual documentation site.

Testing your work

Angular has this amazing things where the tests are run from within the documentation. This is done inside of the <file name="scenario.js"></file> area in the <example></example>. More than likely the example you're updating already has some basic test, but you'll want to update it with your current code, process the docs, and the run them:
grunt docs:process
grunt test:e2e
Try to make your tests as comprehensive as possible.

Submitting your work

Once you have made sure your tests pass and you've got what you think is a better example than before you can submit your pull request to the team. Point your pull request at angular.js/master.
You will probably receive a lot of feedback about your pull request. My small changes to ng-class took about a month of back and forth before being merged which you can read yourself.
But I was super happy when they finally went live recently. Hurary

Helpful Tips

Solving Problems

What happens if my branch gets really out of date with the main angular branch?
In these cases you should rebase with the main angular repo and resolve any conlicts. The first step to doing that is setting up a new remote origin called upstream that will let you hook directly into the angular repo.
git remote add upstream https://github.com/angular/angular.js.git
The second step will be to rebase your branch against that repo:
git rebase upstream/master
For more information about rebasing please check out github's suggested regarding this matter.
What about filling out the CLA?
A community licensicing agreement is basically a way for Google's lawyers to be sure that you're not going to claim you have any rights to the code after you give it to them. You can't sue them for abusing your pull request. It's unclear for contributing docs if it's required, but the instructions can be found here:http://docs.angularjs.org/misc/contribute

Saturday, January 19, 2013

Versioned APIs with Express

After reading and watching some of the stuff coming out from Apigee about API Design, I've been convinced that APIs should probably be versioned in the URL using a scheme like this:
http://api.whatever.com/v1/jobs

By the time I realized this the API I had been building with node.js was basically already complete, so I was a little bit sad that I'd have to come up with some complicated versioning scheme.

After a bit of fretting I realized that express can handle this super easy using an interesting feature of the express() instance that it can be mounted to another route using app.use().

This means that your routes don't know which version they are!

Here's your main app file.

app.js file

Then you'll put each version of your API in the routes/ folder named after the version.

routes/v0.js file
Each version of the API can have middleware (such as unique authentication) that only works on that version of the API. One thing that this doesn't cover is unique models per version, but I'll leave that up to you to figure out how to accomplish, because the needs of each app very quite a bit by app. Hope this tip helps!

Tuesday, August 14, 2012

Everything I Know About SVG


Everything I Know About SVGSVG is arguably going to be the main image format of the modern web. I recently wrote an article for Safari Books Online called SVG Icons for New Devices that covers some of the basics of dealing with SVG. This article tries to focus more on the pain points of using SVG in production and it turns out there are many. Read along to see what I’m talking about.

Plain Old <img> Tags

Here’s how you link to your amazing vector image.
<img src="/images/logo.svg">
This is pretty straightforward and should work very well for most of your cases. You can also specifcy width and height this way or in your CSS.

Vector is XML

SVG files are supposed to be human readable, but XML is terrible, so it’s been slow going for me. That being said I have noticed one strange thing about the content of SVG files, notably the fact that there are width and height attributes:
<svg version="1.1" id="Layer_1" xmlns="http://www.w3.org/2000/svg" xmlns:xlink="http://www.w3.org/1999/xlink" x="0px" y="0px" width="15px" height="15px" viewBox="0 0 15 15" enable-background="new 0 0 15 15" xml:space="preserve">
Sometimes in Firefox when you scale up SVG images (browser-zoom) you get some weird bluriness. If you change the width and height from px to em this bluriness seems to myseriously dissappear. Because in this case it’s a sqaure 1em and 1em work great. I’m not sure if this is a bug in Firefox or if it’s even still a problem in the newer versions. Your mileage may very.

Basic Icons

It’s pretty easy to use SVG for icons and just make them background images. This is probably your standard use case for SVG anyway.
.icon {
    height: 16px;        
    width: 16px;
    background-size: 16px 16px;
}

.icon-arrow {
    background: url("/images/icon-arrow.svg") no-repeat;
}

<div class="icon icon-arrow"></div>

Relatively Easy EM Icons

EM’s are relative to font-size, so you can easily use them to size your SVG images relative to some text, which can be really helpful in a lot of cases. Here’s an exaple of putting them next to some headings.
h1 {
    font-size: 24px;
}

h2 {
    font-size: 18px;
}

.icon-before {
    background-size: 1em 1em;
    padding-left: 1em;
}

.icon-arrow {
    background: url("/images/icon-arrow.svg") no-repeat;
}

<h1 class="icon-before icon-arrow">Header 1 w/Icon</h1>
<h2 class="icon-before icon-arrow">Header 2 w/Icon</h2>

Fallbacks

If you care about IE8 or Android 2.x or other browsers that don’t support SVG images you can combine some fanciness like this with a simple custom build of modernizr to easily fallback without too much ugliness.
.icon {
    height: 16px;        
    width: 16px;
    background-size: 16px 16px;
    background-repeat: no-repeat;
}

/* only show svg icon */
.svg .icon-arrow {
    background-image: url("/images/icon.svg");
}

/* don't show anything but png */
.no-svg .icon-arrow {
    background-image: url("/images/icon.png");
}    

<div class="icon icon-arrow"></div>
Note: With this approach we do have to wait until modernizr adds our svg or no-svg classes to the pages <body> before the images show up. Other fallback approaches can avoid the wait, but this guarantees the right thing will show up in the right browser.
Another Note: Someone really needs to write a Sass plugin one day to create the PNG images directly from the SVG, so that we don’t have to bug the designer for it.

Data-URIs

Data URI’s are this amazing way to embed binary image content directly into your CSS files. This results in a reduce number of seperate downloads and can improve performance in some situations (hover states, etc).
.icon {
    height: 16px;        
    width: 16px;
    background-size: 16px 16px;
    background-repeat: no-repeat;
}

.icon-arrow {
    background-image: url(data:image/svg+xml;base64,..);
}

<div class="icon icon-arrow"></div>
Compass provides the inline-data() helper to assist with base64ing images and bringing them into your stylesheets. You can also drag and drop your SVG images into the SVG is Rad tool I wrote to get the proper CSS.

Weird Bugs

In some versions of WebKit (Chrome < 18 and Safari < 6) you cannot combine SVG data-URIs and background-repeat: repeat-x. The image turns into a blurry mess! Because of this bug in some cases I had to switch to referencing the SVG from a file and it was fine.

MIME Types

If you try to link to external SVG files for background images and don’t specify the correct mime type they just won’t show up. This happened to us after we switched from base-64 encoded SVGs to linking to files, because the so-called magic mime type detection script in our version of Apache noticed that our SVG files looked like XML and served them up as text/xml.
You can add this to your .htaccess file if Apache is doing the same thing to you (hat tip: this 5 year old article):
AddType image/svg+xml svg svgz
AddEncoding gzip svgz
If you’re on NGINX check out this stackoverflow question about SVG MIME types and NGINX.

Related Research

Other people are doing a lot of interesting things with SVGs at the moment. Here are some topics I don’t know quite enough about at the moment:
  1. Spriting with SVG Images
  2. Styling SVG with CSS
  3. SVG Stacks

Thursday, May 3, 2012

Sass Mixins

I was asked to make some buttons at work. I thought it might be a good idea to play with Sass mixins to generate the buttons. I got really excited about this and tried my hardest to generate the buttons from a single base color. It was fun and hard at the same time. It ended up being kind of crap.

In my earlier post about Sass color palettes I was playing with keeping all my colors in a single file. this way we can keep track of them and easily change them in the future. We won't get lost in slightly difference shades of blue everywhere. It's a good idea.

Not being an expert at color theory, I couldn't have told you how to get from one shade to another with anything other than Sass's built-in lighten() and darken() functions. That quickly got me a really terrible looking button, so I had try more complicated approaches.

I had the original CSS styles to work with already, so I tried to make legitimate guesses as to how to get from say the top of the gradient color to the bottom of the gradient color. I did math around the rgb() and though about adding or subtracting various amounts of red, green, or blue. The gradients weren't too bad, but the borders were tricky, they weren't just darker, they were redder, but only for the orange button.

So then I had the idea to inspect the hue, lightness, and saturation. I could get each colors hsl() codes, I could then figure out how different each part of the button was from the other colors, hopefully finding a way to pick a good base color. This proved a decent approach, and it seemed to work pretty much universally, well you know, it worked out okay for most of the darker colors, but lighter colors presented another problem.

It turns out that the trick is dealing with gray, especially light gray, because all of the sudden all of the supporting colors have to change and where you were once lightening colors, you may have to darken them. A decent measure of grayness was to look at saturation. Once I established grayness I also had to look at lightness before deciding which color text to use.

I spent maybe 1 to 3 hours on this and found it a fairly tedious process. It not something I'd wish on anyone else, but I did learn a bit. What do you think of the results?

Conclusion

This experiment was worthwhile, but we ended up just sass-ifying the webkit-only CSS the designer gave us and hard-coding each button separately. Two different buttons might have different box-shadow lengths or border sizes, not to mention hover states. I'm still glad I learned about how mixins work and that this sort of thing was definitely doable. Like a lot of approaches to design (grids, etc) I think it really takes working with a designer that can see the value in the approach and work closely with you on it from the start. Anyone have suggestions on how it could been done better?

Friday, April 6, 2012

JSConf 2012 Notes


Introduction

JSConf has a pretty great reputation. Node.js, Phonegap and other huge projects were announced in JSConf's past. There are legendary parties and fantastic speakers. This year was no exception. As such, the 250 conference tickets sold out in less than 5 minutes. We dressed up like cowboys, rode a mechanical bull and even had shoot-outs. It was a pretty awesome adventure. 

Themes

I try to look for themes in the talks that I saw to figure out what's going on in the community right now. Other than the cowboy theme there were a couple of ideas I heard repeated more than once:
  1. Experimentation / play leads to great ideas.
  2. Everyone is working really hard to make JS faster.
  3. We need more women/diversity in JS.
  4. Build tools / dependencies let us do cooler things.

My Talk

I gave a quick talk about some things I think are important to the JS community.
  1. Open Source
  2. Respecting Diversity
  3. Helping New People
  4. Startup/DIY Culture
You can see the slides here: JavaScript as a Subculture

While no one mentioned it directly, this popular tweet was in response to my talk: Talk about JS culture: "we hated ie, we hated tables,.. What's the new enemy? Someone answers: the threat of native" good answer @jsconf. I'm famous!

Big Announcements

People look to JSConf for big announcements. There were a few of those. It usually takes a few years though to see which ones actually end up panning out.
  1. Project Bikeshed client/server-side flash -> js converter by UXEBU
  2. Grunt ant/rake for JS, by Ben Alman
  3. Everyone got Mozilla B2G Phones for hacking. Sooo cool.
  4. Joyent's node.js PaaS is being phased out and moved to Nodejitsu.
  5. The Chrome team introduced Source Maps for debugging minified code.

Best Talks

I obviously couldn't see all of the talks, so I may have missed a few things, but here were some of the top talks I saw at least in relation to front-end development, which is what I do at my day job. Many other amazing talks were also given about improving JS Performance in the browser, other programming languages and politics.

Jeff Archibald: AppCache is a Douchebag


Summary: AppCache is not progressive enhancement, it completely changes how the browser handles your site.

This talk laid out basically all of the flaws and awkward parts of using HTML5 AppCache and how to use localStorage, iframes and other hacks to get it to behave properly. He made a separation between "get stuff" sites like blogs and wikipedia, and "do stuff" sites like drawing apps and games. It was really entertaining, but ultimately a depressing talk, because of how hard it is to get the AppCache to work properly :(
  1. http://lanyrd.com/2012/jsconf-us/sqxcz/
  2. http://dl.dropbox.com/u/2501978/appcache-diagram.svg

Remy Sharp: Build Anything


Summary:
Use HTML5's JS APIs to progressively enhance your site.

A good reminder of the latest crop of fairly well supported HTML5/JS APIs. We're already using most of these at oDesk, but some that we are not yet using include the HTML5 Drag'n'Drop API to handle file uploading, HTML5 input types, HTML5 History/PushState API, and EventSource (Server sent events).
  1. http://lanyrd.com/2012/jsconf-us/sqxcb/

Paul Irish: Tools


Summary:
There are a lot of great tools out there to help web development. Embrace these dependencies.

Paul Irish laid out every testing framework, css pre-processor, debug tool, and CI Server you could use to maintain your site. He also talked about source maps and some mobile web tools. He mentioned Jenkins and Travis as decent CI Servers.
  1. http://dl.dropbox.com/u/39519/talks/jsconf-tools/index.html

Jacob Thornton: Brûlons les musées


Summary:
We can make things better by starting over, but we need to have clear specs/tests to make sure our new thing still works the same.

The creator of Twitter Bootstrap and ender.js took us for a journey through Dada-ism and french futurism, finally landing on a quote by a famous futurist which translates to "burn the libraries". Jacob tried doing that with ender.js and it ended up being kind of awesome, but quickly people realized small differences with jQuery made it really hard to use. He took a similar approach at re-writing mustache.js in a project called Hogan, which ended up being really successful, because mustache.js had unit tests that could be used to ensure it was perfectly compatible. His approach ended up being significantly faster than the original and eventually was accepted into the mustache.js core. Super funny talk. Final quote "Burn all the libraries without tests".
  1. http://lanyrd.com/2012/jsconf-us/sqxkg/

New Friends

  1. I briefly talked to Nicole Sullivan, who was nice nice nice and seemed pleased as punch we were doing OOCSS at oDesk. She gave me some tips on grids and HTML5, which I'll share with my teams.
  2. I spoke with @substack who made browserling/testling who said we could get it to work behind our VPN if we opened up an SSH Tunnel somehow.
  3. I spoke with Devrim Yasar from Koding about his in-browser IDE. It's very similar to Cloud9, but it's more friendly to non-js environments. I'd really love to give something like this a try, but it will take some work to tweak our dev infrastructure.
  4. Ben Alman from Bocoup showed me his command-line tool Grunt, which is similar to my odesklint tool. It has built-in jshint, minification, and can run qUnit on the server-side with PhantonJS out-of-the box (almost). Grunt has a plugin architecture and may be a good starting point for future tools. I'm going to try and get the unit testing thing working and integrated with a CI server. :)
  5. I talked to the guys from Twillio, who make a really easy to use API for building SMS sender/receivers. Think user-verification and other use-cases. Fantastic stuff.
  6. John David Dalton had some ideas about how to speed up ES5 shims for things like Array.forEach. Really smart guy!
  7. I had a two total fanboy moments when I got to meet Rebecca Murphey and Remy Sharp, but you know everyone has their favorites. I met a bunch of other cool people too. Yay for talking to people. It can be so hard!